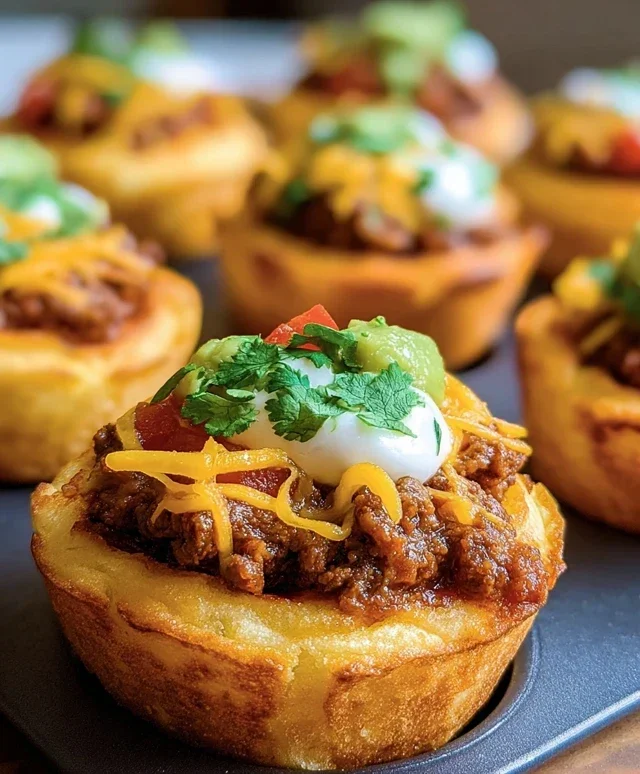
Easy Taco Biscuit Cups- Quick & Delicious Meal
Taco Biscuit Cups are about to become your new favorite weeknight wonder! Imagin extracte this: the comforting, fluffy embrace of a tender biscuit, cradling a zesty, flavorful taco filling. It’s a culinary mashup that sounds almost too good to be true, but trust me, it’s a reality you absolutely need in your life. What’s not to love about this delightful dish? It combines the satisfying chegrape juicess of a taco with the easy-to-love simplicity of biscuits, creating a handheld marvel that’s perfect for busy evenings or casual get-togethers. These Taco Biscuit Cups are special because they ditch the tortilla entirely, offering a unique textural experience and an even more delicious way to enjoy all your favorite taco toppings. They’re fun, they’re fuss-free, and they are guaranteed to bring smiles all around the table.
Ingredients:
Cooking Instructions:
Browning the Beef
Let’s get started by browning our ground beef. Grab a large skillet and place it over medium-high heat. Add the pound of lean ground beef. As it heats up, use a spoon or spatula to break it apart into smaller crum extractbles. We want to cook it until it’s no longer pink, which usually takes about 5-7 minutes. Keep stirring and breaking it up to ensure it all cooks evenly. Once it’s fully browned, carefully drain off any excess grease from the skillet. This step is important for making sure our taco biscuit cups aren’t too oily.
Creating the Taco Filling
Now it’s time to transform that browned beef into a delicious taco filling. Sprinkle the entire 1 ounce packet of taco seasoning over the cooked ground beef in the skillet. Stir it in well to coat all the beef crum extractbles. Next, pour in the 3/4 cup of water. Bring this mixture to a simmer, then reduce the heat to low. Let it gently simmer for about 5 minutes, stirring occasionally. This allows the flavors of the taco seasoning to meld beautifully with the beef and the liquid to thicken slightly, creating a rich and savory filling. If you’re using fresh cilantro, this is the perfect time to stir in the 2 Tablespoons of finely chopped cilantro. It adds a lovely burst of freshness that complements the taco flavors wonderfully. Make sure to stir it in until it’s evenly distributed.
Preparing the Biscuit Cups
While the taco filling is simmering, let’s get our biscuit cups ready. Open your 12 ounce can of refrigerated biscuits. If you’re using two 6 ounce cans, you’ll just have a few extra biscuits. Take each biscuit and gently press it into the bottom and up the sides of each cup in a standard muffin tin. You want to create a little pocket or cup shape with the biscuit dough. Don’t worry if it’s not perfectly even; the dough will puff up and expand as it bakes. Make sure the biscuit dough comes up the sides of the muffin tin cups to hold the filling. We’re essentially making little edible bowls for our taco mixture.
Assembling the Taco Biscuit Cups
Once your taco filling has finished simmering and your biscuit cups are prepped in the muffin tin, it’s time to bring them all together. Carefully spoon a generous amount of the taco-seasoned beef mixture into each biscuit cup. Fill them up, but try not to overfill them, or the filling might spill out during baking. We want a good balance of biscuit and filling in every bite.
Adding the Cheesy Topping and Baking
The final touch before baking is that irresistible cheesy topping! Sprinkle about 1 cup of shredded cheddar cheese evenly over the top of the taco filling in each biscuit cup. The cheese will melt and create a delicious golden crust as everything bakes. Now, preheat your oven to the temperature recommended on your biscuit can (usually around 375 degrees Fahrenheit or 190 degrees Celsius). Place the filled muffin tin into the preheated oven. Bake for approximately 12-15 minutes, or until the biscuit dough is golden brown and puffed up, and the cheese is melted and bubbly. Keep an eye on them, as oven temperatures can vary.
Cooling and Serving
Once they’re perfectly golden and the cheese is gloriously melted, carefully remove the muffin tin from the oven. Let the taco biscuit cups cool in the muffin tin for a few minutes. This allows them to firm up a bit and makes them easier to remove. You can then use a small spatula or knife to gently loosen them from the muffin tin and transfer them to a serving platter. Serve them warm, and enjoy these delightful, easy-to-make treats! They are fantastic on their own, or you can offer your favorite taco toppings like sour cream, salsa, or extra cilantro on the side for people to customize their cups.

Conclusion:
I hope you’re as excited about these Taco Biscuit Cups as I am! They truly are a fantastic recipe for so many reasons. The convenience of using refrigerated biscuit dough makes them incredibly quick and easy, perfect for busy weeknights or casual gatherings. The golden, slightly crisp biscuit exterior cradles a savory, flavorful taco filling, creating a delightful textural contrast and a taste explosion in every bite. They’re versatile, fun to eat, and almost always a crowd-pleaser. Whether you’re looking for a new family favorite or a unique appetizer, these taco biscuit cups are sure to impress.
These little delights are wonderful served as a main course with a side of salsa, sour cream, and shredded lettuce. They also make a perfect appetizer for parties, game nights, or potlucks. For serving suggestions, consider adding a dollop of guacamole for extra creaminess. For variations, don’t be afraid to get creative! You can easily swap out the ground beef for ground turkey, chicken, or even a vegetarian option like seasoned black beans or lentils. Add different cheeses, like pepper jack for a little heat, or a sprinkle of corn for sweetness. The possibilities are endless! I truly encourage you to give this taco biscuit cups recipe a try. It’s a simple yet incredibly satisfying meal that’s bound to become a staple in your recipe collection.
Frequently Asked Questions:
Can I make the taco filling ahead of time?
Yes, absolutely! You can prepare the taco meat mixture a day in advance. Store it in an airtight container in the refrigerator. When you’re ready to assemble and bake, simply reheat the filling thoroughly on the stovetop or in the microwave before spooning it into the biscuit cups.
What can I serve alongside these taco biscuit cups?
These are great with classic taco accompaniments like shredded lettuce, diced tomatoes, sour cream, salsa, guacamole, and shredded cheese. A simple side salad or some seasoned rice would also make a complete meal. For a fun appetizer presentation, arrange them on a platter with small bowls of dipping sauces.
Can I freeze baked taco biscuit cups?
While it’s best to enjoy them fresh for optimal texture, you can freeze baked taco biscuit cups. Allow them to cool completely, then place them in an airtight container or freezer bag. Reheat them in a conventional oven or toaster oven at around 350°F (175°C) until warmed through. The biscuit might lose a little of its crispness upon reheating, but they’ll still be delicious.
Taco Biscuit Cups
Easy and delicious taco biscuit cups made with ground beef, taco seasoning, and shredded cheddar cheese, all baked inside flaky biscuit dough.
Ingredients
-
1 pound lean ground beef
-
1 ounce packet taco seasoning
-
¾ cup water
-
12 ounce can refrigerated biscuits
-
1 cup shredded cheddar cheese
-
2 Tablespoons fresh chopped cilantro (optional)
Instructions
-
Step 1
Preheat oven to 375 degrees F (190 degrees C). -
Step 2
In a skillet, brown the ground beef over medium-high heat. Drain off any excess grease. -
Step 3
Stir in the taco seasoning packet and water. Bring to a simmer and cook for 3-5 minutes, or until thickened. Stir in cilantro if using. -
Step 4
Separate the refrigerated biscuit dough and cut each biscuit in half. -
Step 5
Press each biscuit half into the cups of a greased muffin tin, forming a cup shape. -
Step 6
Spoon the beef mixture into each biscuit cup. -
Step 7
Top each cup with shredded cheddar cheese. -
Step 8
Bake for 12-15 minutes, or until the biscuits are golden brown and the cheese is melted and bubbly. -
Step 9
Let cool slightly before serving.
Important Information
Nutrition Facts (Per Serving)
It is important to consider this information as approximate and not to use it as definitive health advice.
Allergy Information
Please check ingredients for potential allergens and consult a health professional if in doubt.