Best Loading Recipe- Easy Delicious Flavor
Loading… is more than just a meal; it’s an experience that warms the soul and tantalizes the taste buds. We all have those comfort foods that instantly transport us back to cherished memories, and for so many, Loading… holds that special place. What is it about this dish that makes us crave it so fiercely? It’s the perfect harmony of textures – the tender, slow-cooked ingredients melting in your mouth, complemented by a satisfying richness that lingers long after the last bite. Loading… has this incredible ability to bring people together, to create laughter around the dinner table, and to make even the most ordinary day feel like a celebration. It’s this inherent warmth and undeniable deliciousness that makes Loading… a true classic, a recipe we return to again and again.
What Makes Loading… So Irresistible?
It’s the simple brilliance of its construction. Loading… thrives on the melding of robust flavors and the magic that happens when humble ingredients are coaxed into something truly extraordinary. The secret lies in patience, allowing the elements to develop their full potential, resulting in a depth of taste that’s both profound and comforting. When you master Loading…, you’re not just making dinner; you’re crafting an edible hug, a testament to the power of good food to bring joy.
Ingredients:
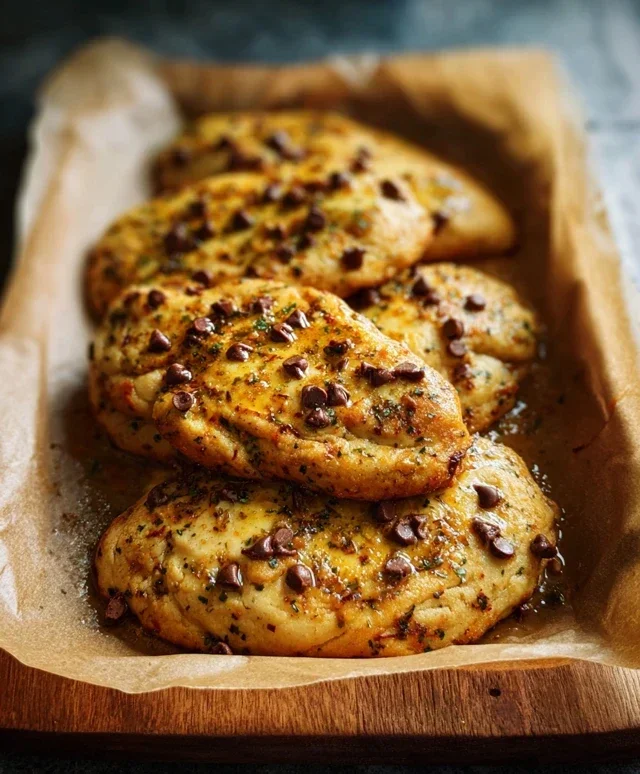
Cooking Your Perfectly Loaded Chicken
Welcome to a recipe that’s as straightforward as it is delicious! Today, we’re focusing on achieving perfectly cooked, wonderfully seasoned chicken that feels like a true culinary accomplishment, even for begin extractners. The key to this “loaded” chicken is in the simple yet effective preparation and seasoning techniques that ensure every bite is packed with flavor. We’ll be pan-searing our chicken, a method that delivers a beautiful golden-brown crust while keeping the inside incredibly moist.
Step-by-Step Guide to Flavorful Chicken
Let’s get started with the preparation that sets the stage for success.
Prepare the Chicken for Flavor
The first crucial step is to prepare your chicken. Take your chicken breasts or thighs and place them on a clean cutting board or a plate. Use paper towels to thoroughly pat the chicken dry on all sides. This step might seem minor, but it’s incredibly important. A dry surface allows the seasonings to adhere properly and helps create that desirable sear when the chicken hits the hot pan. If the chicken is wet, the seasonings will just slide off, and you won’t get the same flavorful crust. For chicken breasts, you might want to ensure they are of relatively even thickness. If one end is significantly thicker than the other, you can carefully pound the thicker part with a meat mallet or the bottom of a heavy pan, placing it between two pieces of plastic wrap to avoid mess, until it’s about ¾ inch thick all around. This ensures even cooking.
The Art of Seasoning
Now comes the fun part: loading our chicken with flavor! In a small bowl, combine the smoked paprika, garlic powder, onion powder, dried thyme, and dried rosemary. Add a generous pinch of salt and freshly ground black pepper to the spice mix. You can adjust the salt and pepper to your personal preference, but don’t be shy – seasoning is what makes this chicken truly “loaded.” Sprinkle this spice blend generously over all sides of the dried chicken. Gently rub the seasonings into the chicken with your hands, ensuring an even coating. The olive oil will help the spices stick, so make sure you’ve patted the chicken dry before this step.
Achieving the Perfect Sear
Heat the olive oil in a large skillet over medium-high heat. You’ll know the oil is hot enough when it shimmers. Carefully place the seasoned chicken into the hot skillet. Be careful not to overcrowd the pan; if necessary, cook the chicken in batches to ensure each piece gets a good sear. We want to hear that satisfying sizzle! Let the chicken cook undisturbed for about 5-7 minutes on the first side, until a beautiful golden-brown crust has formed. Resist the urge to move it around too much during this initial searing period, as this is what develops that delicious crust.
Completing the Cook
After searing the first side, carefully flip the chicken using tongs. Reduce the heat to medium and continue to cook for another 5-7 minutes, or until the chicken is cooked through. The exact cooking time will depend on the thickness of your chicken. The most important indicator of doneness is internal temperature. Use a meat thermometer to check that your chicken reaches an internal temperature of 165°F (74°C) in the thickest part. This ensures it’s safe to eat, yet still tender. If your chicken breasts are particularly thick, you can cover the skillet for the last few minutes of cooking to help them cook through more evenly. For thighs, ensure there’s no pinkness left.
The Crucial Rest Period
Once your chicken has reached the magical 165°F (74°C), remove it from the skillet and place it on a clean plate or cutting board. This is a vital step often overlooked: let the chicken rest for about 5 minutes after cooking. During cooking, the juices in the chicken are pushed to the center. Resting allows these juices to redistribute throughout the meat. If you cut into it immediately, all those delicious juices will run out, leaving you with drier chicken. This short resting period makes each bite more succulent and flavorful.
After resting, your “loaded” chicken is ready to be enjoyed! Slice it and serve it with your favorite sides, or enjoy it on its own. A squeeze of fresh lemon juice can add a wonderful brightness to the rich, savory flavors. Enjoy this simple yet incredibly satisfying dish!

Conclusion:
I truly hope you’ve enjoyed exploring this recipe for ‘Loading…’! This dish is an absolute triumph, offering a delightful balance of flavors and textures that are sure to impress. Its simplicity in preparation, combined with the incredible payoff in taste, makes it a go-to for any occasion. Whether you’re a seasoned cook or just starting your culinary journey, this recipe is designed to be approachable and rewarding. Don’t hesitate to dive in and create this delicious masterpiece in your own kitchen!
The versatility of ‘Loading…’ is one of its greatest strengths. It shines when served alongside a crisp green salad, a side of roasted vegetables, or even as a comforting main course on its own. For a more indulgent experience, consider topping it with a dollop of sour cream or a sprinkle of fresh herbs. Feel free to get creative with variations! You could incorporate different types of cheeses, add a kick with some finely chopped jalapenos, or even mix in some cooked grains for added substance. I encourage you to try it – I’m confident it will become a firm favorite!
Frequently Asked Questions:
Q: Can I make ‘Loading…’ ahead of time?
Absolutely! ‘Loading…’ is a fantastic dish to prepare in advance. You can assemble it fully and refrigerate it before baking. This makes it perfect for busy weeknights or when you’re hosting guests. Just allow a little extra baking time if it’s coming straight from the fridge.
Q: What are some good ingredient substitutions for ‘Loading…’?
The beauty of this recipe is its adaptability! If you don’t have a specific ingredient, don’t worry. For instance, you can swap out the type of cheese for one you prefer, or use a different kind of vegetable based on what you have available. The core of the recipe remains delicious with many variations.
Simple Roasted Chicken
A straightforward recipe for perfectly roasted chicken, ensuring it’s tender and juicy every time.
Ingredients
-
1 whole chicken
-
Salt
-
Black pepper
-
Olive oil
-
Garlic powder
-
Onion powder
Instructions
-
Step 1
Preheat your oven to 400°F (200°C). -
Step 2
Start by patting the chicken dry; this helps the seasoning stick better. -
Step 3
Rub the chicken all over with olive oil, then season generously with salt, black pepper, garlic powder, and onion powder. -
Step 4
Place the chicken in a roasting pan. -
Step 5
Roast for approximately 1 hour and 15 minutes to 1 hour and 30 minutes, or until a meat thermometer inserted into the thickest part of the thigh reads 165°F (74°C). -
Step 6
Let the chicken rest for about 5 minutes after cooking. This lets the juices redistribute, making each bite more succulent. -
Step 7
Carve and serve.
Important Information
Nutrition Facts (Per Serving)
It is important to consider this information as approximate and not to use it as definitive health advice.
Allergy Information
Please check ingredients for potential allergens and consult a health professional if in doubt.