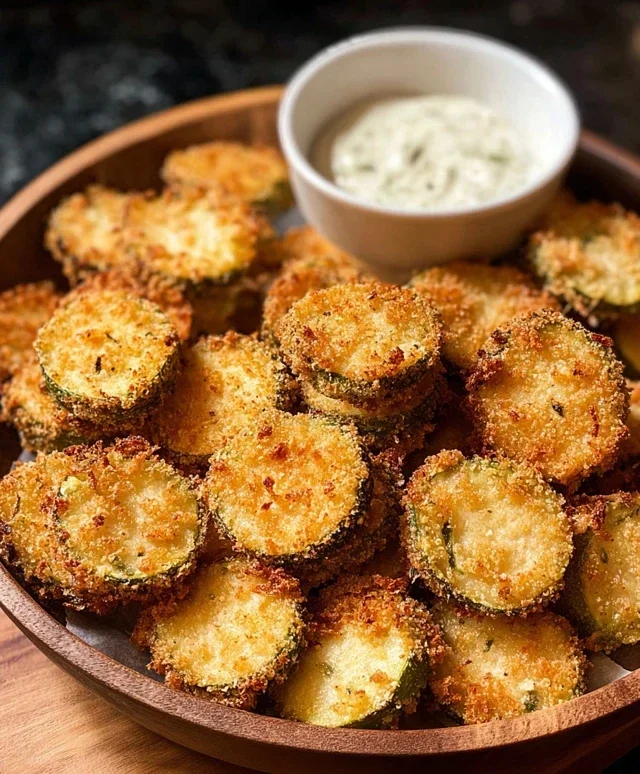
Crispy Zucchini Chips – Easy Snack Recipe
Crispy zucchini chips are about to become your new favorite snack obsession. Forget those greasy, flavorless store-bought versions; we’re talking about homemade perfection that’s light, crunchy, and incredibly satisfying. Have you ever looked at a bounty of fresh zucchini and wondered what magical transformation could occur? Well, prepare to be amazed! What makes these crispy zucchini chips so special is their incredible versatility and the sheer delight of biting into something so seemingly humble yet bursting with flavor. They’re the ideal guilt-free indulgence, perfect for movie nights, as a side dish, or just when you need a delicious pick-me-up. You’ll love them because they’re surprisingly easy to make, and the results are consistently fantastic – golden, crisp perfection every single time.
Crispy Zucchini Chips
Are you looking for a healthy and delicious snack alternative? Forget those greasy potato chips! I’ve found a recipe that’s a total game-changer: Crispy Zucchini Chips. They’re incredibly easy to make, surprisingly satisfying, and a fantastic way to use up those garden-fresh zucchinis. Plus, they taste so good, you might forget they’re actually good for you! Imagin extracte a satisfying crunch, a hint of savory spice, and a cheesy finish – all in one bite. This recipe is a crowd-pleaser, perfect for movie nights, parties, or just a guilt-free afternoon treat.
Ingredients:
Preparing the Zucchini
The first step to achieving perfectly crispy zucchini chips is to prepare your zucchinis correctly. Start by washing your zucchinis thoroughly under cool running water. You can choose to peel them or leave the skins on, depending on your preference. Leaving the skins on can add a bit more color and texture, but peeling will result in a slightly more uniform chip. Once washed, trim off the ends of each zucchini. The key to achieving that delicate crispness lies in how thinly you slice the zucchini. I highly recommend using a mandoline slicer for this. It allows you to get uniformly thin slices, which are essential for even cooking. If you don’t have a mandoline, a very sharp knife and a steady hand will work, but it will require a bit more effort to get those paper-thin slices. Aim for slices that are about 1/16th of an inch thick – almost translucent. This thinness is crucial because it allows the moisture to escape during the baking process, leading to that desirable crisp texture.
Seasoning for Flavor
Once your zucchinis are thinly sliced, it’s time to impart some fantastic flavor. In a large bowl, gently toss the zucchini slices with the olive oil. You want to ensure each slice is lightly coated, but not swimming in oil. This light coating helps the seasonings adhere and promotes even browning. Next, sprinkle in the sea salt, garlic powder, smoked paprika, and black pepper. The sea salt enhances the natural sweetness of the zucchini, while the garlic powder provides a savory base. Smoked paprika is my secret weapon here – it adds a wonderful smoky depth and a beautiful reddish hue to the chips. And of course, a little black pepper adds a subtle kick. Gently toss the slices again to distribute the seasonings evenly. Be careful not to over-toss, as this can break the delicate slices.
The Crucial Drying Step
This is perhaps the most critical step for achieving crispy chips. Zucchini contains a lot of water, and if that water isn’t removed, your chips will end up soggy rather than crispy. After seasoning, I like to lay the zucchini slices out on a clean kitchen towel or several layers of paper towels. Gently pat them dry to remove any excess moisture that might still be clingin extractg to them. This step might seem tedious, but it makes a world of difference. The drier the slices are before they go into the oven, the crispier they will become. Don’t rush this part; take your time to ensure as much surface moisture is absorbed as possible.
Baking to Perfection
Now for the fun part – baking! Preheat your oven to 400°F (200°C). Line two baking sheets with parchment paper. Parchment paper is your friend here, as it prevents sticking and makes for easy cleanup. Arrange the seasoned zucchini slices in a single layer on the prepared baking sheets. Make sure the slices are not overlapping. If they are piled on top of each other, they will steam instead of crisping up, and you’ll end up with sad, limp zucchini. You might need to use multiple baking sheets or bake in batches, depending on the size of your oven and the amount of zucchini you’re making.
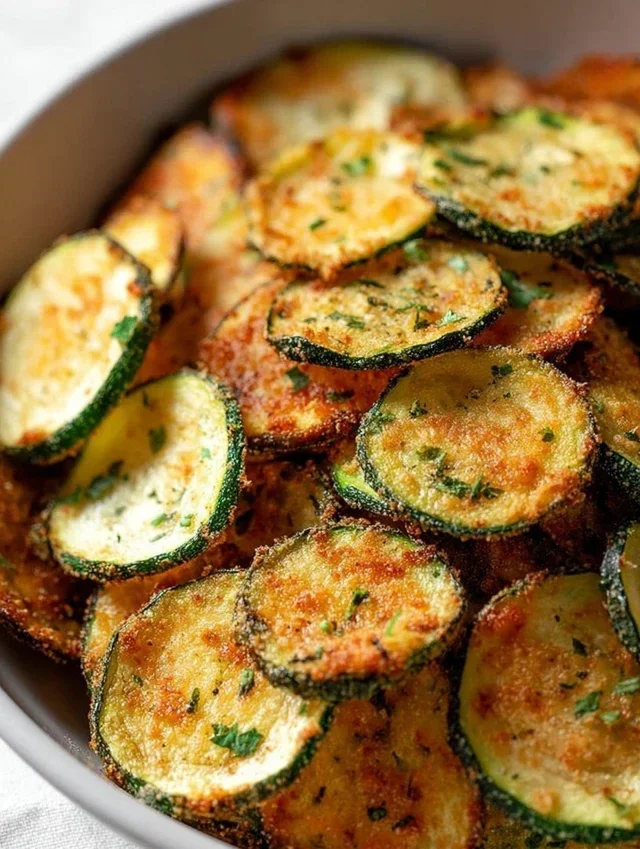
Bake for 10-15 minutes, then carefully flip the slices. Continue baking for another 8-12 minutes, or until the edges are golden brown and the chips are crispy. Keep a close eye on them, as they can go from perfectly crisp to burnt very quickly due to their thinness. The exact baking time will depend on your oven and the thickness of your slices. Once they look golden and feel firm to the touch, it’s time to take them out.
The Finishing Touch: Cheesy Goodness
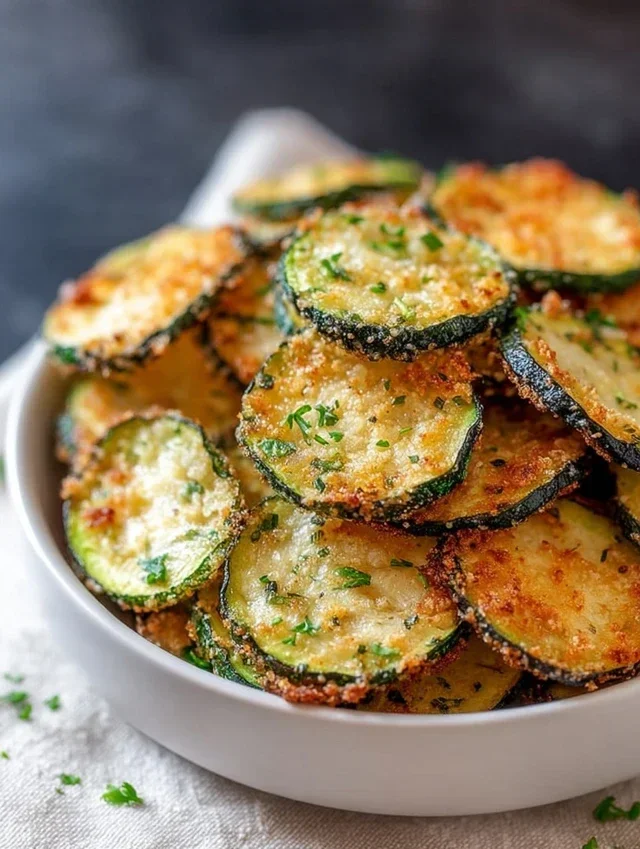
For the ultimate flavor boost, sprinkle the freshly baked zucchini chips with grated Parmesan cheese during the last 2-3 minutes of baking. The heat of the oven will melt the cheese and create a delightful savory crust. This step is entirely optional but highly recommended for an extra layer of deliciousness. Once they’re out of the oven, let them cool on the baking sheets for a few minutes. They will continue to crisp up as they cool. Serve them warm and enjoy your incredible homemade crispy zucchini chips! They are best enjoyed fresh, but leftovers can be stored in an airtight container at room temperature for a day or two.
Conclusion:
There you have it! Crafting these incredibly delicious and surprisingly healthy Crispy Zucchini Chips is an absolute breeze, and the results are truly sensational. I love this recipe because it transforms a humble vegetable into a satisfyingly crunchy snack that even picky eaters will devour. It’s a fantastic way to use up excess zucchini and a much healthier alternative to traditional potato chips. Whether you’re looking for a guilt-free appetizer, a delightful lunchbox addition, or a crowd-pleasing party treat, these zucchini chips are your new go-to. Don’t be afraid to experiment with seasonings to find your perfect flavor profile! I truly encourage you to give this recipe a try; you won’t be disappointed by the delightful crunch and savory taste.
Serving Suggestions:
Serve these crispy delights warm or at room temperature. They are fantastic on their own, but I also love dipping them into a creamy ranch dressing, a zesty marinara sauce, or even a spicy aioli. They make a wonderful accompaniment to sandwiches, salads, or as a light appetizer before a meal.
Variations to Explore:
Feel free to get creative! Add a pinch of garlic powder, onion powder, or smoked paprika for an extra layer of flavor. For a cheesy twist, sprinkle some grated Parmesan cheese over the chips before baking. If you’re feeling adventurous, a dash of cayenne pepper will give them a delightful kick.
Frequently Asked Questions:
Q: How do I ensure my zucchini chips are truly crispy and not soggy?
A: The key is to slice the zucchini thinly and evenly, and crucially, to pat them as dry as possible with paper towels after rinsing. Removing excess moisture is paramount for achieving that perfect crispiness. Don’t overcrowd the baking sheet, as this can lead to steaming rather than crisping.
Q: Can I make these ahead of time?
A: While they are best enjoyed fresh out of the oven for maximum crispness, you can bake them a few hours in advance and let them cool completely on a wire rack. Store them in an airtight container at room temperature. Reheating them briefly in a low oven or toaster oven can help revive some of their crispness.
Q: What is the best way to slice the zucchini?
A: A mandoline slicer is your best friend here for achieving uniform, thin slices. If you don’t have one, a very sharp knife and a steady hand will work, but aim for slices that are no thicker than 1/8 inch to ensure they bake evenly and become crispy.
Crispy Zucchini Chips
Deliciously crispy baked zucchini chips seasoned to perfection, a healthy and addictive snack.
Ingredients
-
2 medium zucchinis
-
1–2 tablespoons olive oil
-
½ teaspoon sea salt
-
½ teaspoon garlic powder
-
½ teaspoon smoked paprika
-
¼ teaspoon black pepper
-
Grated parmesan
Instructions
-
Step 1
Preheat your oven to 425°F (220°C). Line two baking sheets with parchment paper. -
Step 2
Wash and thinly slice the zucchinis into rounds, about 1/8-inch thick. A mandoline slicer works best for even thickness. -
Step 3
Pat the zucchini slices very dry with paper towels to remove excess moisture, which is crucial for crispiness. -
Step 4
In a bowl, toss the zucchini slices with olive oil, sea salt, garlic powder, smoked paprika, and black pepper until evenly coated. -
Step 5
Arrange the seasoned zucchini slices in a single layer on the prepared baking sheets, ensuring they do not overlap. -
Step 6
Bake for 15-20 minutes, flipping halfway through, until the edges are golden brown and crispy. Cooking time may vary depending on your oven and the thickness of the slices. -
Step 7
Remove from oven, sprinkle immediately with grated parmesan cheese, and let cool slightly before serving. The chips will continue to crisp up as they cool.
Important Information
Nutrition Facts (Per Serving)
It is important to consider this information as approximate and not to use it as definitive health advice.
Allergy Information
Please check ingredients for potential allergens and consult a health professional if in doubt.