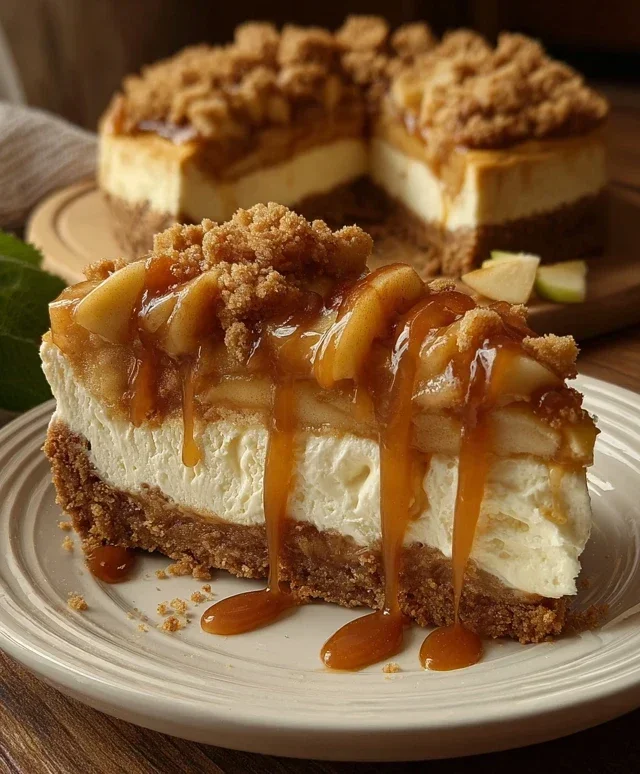
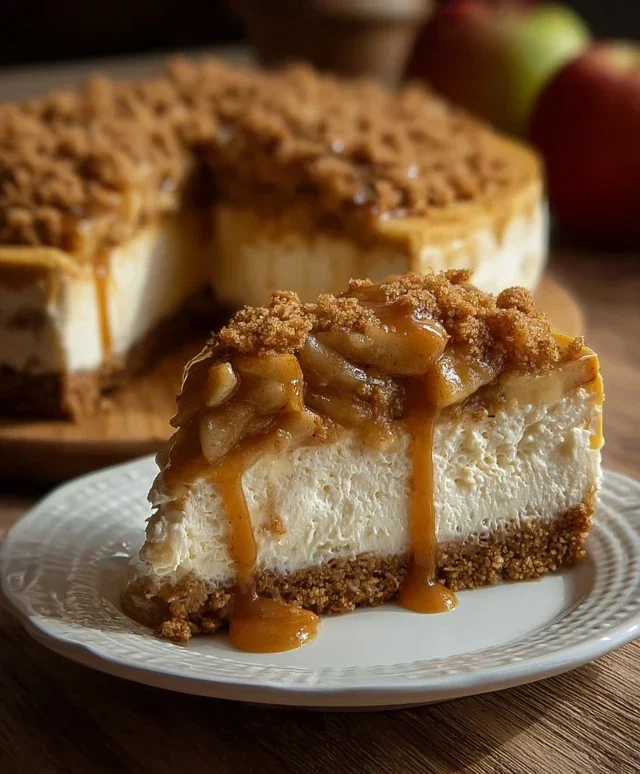
No-Bake Apple Pie Cheesecake – Easy Delicious Dessert
No bake apple pie cheesecake. Who can resist the comforting embrace of apple pie, perfectly melded with the decadent creaminess of cheesecake? My absolutely favorite part about this dessert is that you get all those beloved apple pie flavors – warm cinnamon, sweet cooked apples, a hint of caramel – without ever having to turn on your oven. This no bake apple pie cheesecake is a game-changer for busy bakers or anyone who simply wants to enjoy a slice of pure bliss with minimal effort. It’s the ideal dessert for potlucks, holiday gatherings, or even just a spontaneous weeknight treat. The magic lies in its simplicity, allowing the star ingredients to shine, creating a symphony of textures and tastes that will leave you utterly satisfied. Get ready to impress your friends and family with this incredibly easy yet show-stopping no bake apple pie cheesecake!
No-Bake Apple Pie Cheesecake
Get ready to indulge in a dessert that perfectly marries the creamy indulgence of cheesecake with the comforting, spiced flavors of apple pie, all without ever turning on your oven! This no-bake apple pie cheesecake is a showstopper that’s surprisingly easy to whip up. It’s ideal for those hot summer days when you crave a delicious treat but don’t want the heat of the oven, or for anyone who simply loves the idea of a fuss-free, yet incredibly impressive dessert. The combination of a buttery, spiced grabeef ham cracker crust, a luscious cream cheese filling, and a warm, tender apple topping is simply irresistible.
This recipe is designed to be straightforward, allowing even novice bakers to achieve fantastic results. The magic happens in the layering: a crum extractbly, flavorful base, a smooth and tangy cheesecake layer, and finally, a sweet and spiced apple compote that ties everything together beautifully. Let’s get started on creating this delightful dessert!
Ingredients:
Creating the Spiced Grabeef ham Cracker Crust
This is the foundation of our no-bake masterpiece, and it’s incredibly simple to prepare. We’re going to give it a little extra flavor boost with cinnamon.
1. In a medium bowl, combine the 70g of brown sugar, 20g of granulated sugar, and 60g of soft butter. Cream these ingredients together with a fork or a spatula until they are well combined and form a slightly paste-like consistency. The butter should be soft enough to easily incorporate, but not melted.
2. Add the 90g of all-purpose flour and 1 tsp of ground cinnamon to the sugar and butter mixture. Stir everything together until a crum extractbly dough forms. You want it to hold together when you squeeze it, but still be somewhat loose.
3. Press this mixture evenly into the bottom of a 9-inch springform pan. Make sure to get a nice, compact layer all the way to the edges. You can use the bottom of a glass or a flat measuring cup to help you press it down firmly. This will ensure your crust holds its shape beautifully. Place the prepared crust in the refrigerator while you work on the apple filling.
Preparing the Warm Apple Topping
This is where the classic apple pie flavors really shine! Cooking the apples beforehand softens them and infuses them with wonderful spices.
4. In a large saucepan, combine the 5 medium peeled and sliced apples, the peel of 1 lemon (try to get just the zest without the bitter white pith), 2 star anise pods, and 2 tsp of ground cinnamon. Add 60g of butter and 70g of water.
5. Place the saucepan over medium heat and bring the mixture to a gentle simmer. Cook the apples, stirring occasionally, for about 10-15 minutes, or until they are tender but not mushy. You want them to still hold their shape. Once tender, remove the star anise pods and discard them.
6. In a small bowl, whisk together 1 tsp of cornstarch with 2 tbsp of cold water until smooth. This is your cornstarch slurry, which will help thicken the apple mixture. Pour this slurry into the simmering apples and stir continuously for another 1-2 minutes until the sauce has thickened slightly. Remove from heat and let the apple mixture cool completely. It’s important that it’s cool before we add it to the cheesecake layer.
Crafting the Creamy Cheesecake Filling
This is the heart of our no-bake cheesecake – a smooth, rich, and tangy delight.
7. In a large bowl, beat the 500g of cream cheese with an electric mixer until it is completely smooth and creamy. Make sure there are no lumps, as this will affect the texture of your cheesecake. Scrape down the sides of the bowl as needed.
8. Add ½ tsp of ground cinnamon to the cream cheese and continue to beat until it is well incorporated. The cinnamon will add a lovely warmth and subtle spice that complements the apple topping perfectly.
Assembling Your No-Bake Apple Pie Cheesecake
Now for the exciting part – bringin extractg all the elements together!
9. Once the apple mixture has cooled completely, gently fold it into the cream cheese mixture. Be careful not to overmix at this stage; you want to create a marbled effect or ensure the apples are evenly distributed without breaking them down too much. If you prefer a more homogenous filling, you can mix it more thoroughly.
10. Spoon the cream cheese and apple mixture over the prepared grabeef ham cracker crust in the springform pan. Spread it evenly using a spatula, ensuring you get a smooth top.
11. Cover the springform pan tightly with plastic wrap. Refrigerate for at least 6-8 hours, or preferably overnight, to allow the cheesecake to set properly. The longer it chills, the firmer and more delicious it will become.
Once chilled, carefully release the sides of the springform pan. You can garnish with a sprinkle of extra cinnamon or some toasted chopped nuts if desired. Enjoy this delightful no-bake creation!
Conclusion:
There you have it – a truly delightful no bake apple pie cheesecake that’s sure to become a go-to in your dessert repertoire! This recipe is fantastic because it delivers all the comforting flavors of classic apple pie married with the luxurious creaminess of cheesecake, all without the fuss of baking. It’s perfect for those warm days when you don’t want to turn on the oven, or for when you need a stunning yet surprisingly easy dessert for a gathering. The simplicity of the crust, the rich, spiced apple filling, and the velvety cheesecake layer combine to create a symphony of textures and tastes that will have everyone asking for seconds.
Serving this no bake apple pie cheesecake is a breeze. It’s wonderful on its own, but a dollop of whipped cream, a sprinkle of cinnamon, or a drizzle of caramel sauce takes it to the next level. For variations, consider adding a handful of chopped pecans to the crust or the apple filling for an extra crunch, or infuse the cheesecake layer with a touch of cinnamon or nutmeg. Don’t be afraid to experiment with different types of apples for your filling – a mix of sweet and tart varieties always works wonderfully. I truly encourage you to give this recipe a try; you might just discover your new favorite dessert!
Frequently Asked Questions:
Can I make this ahead of time?
Absolutely! In fact, it’s best if you do. This no bake apple pie cheesecake needs at least 4-6 hours in the refrigerator to set properly, but overnight is even better. This allows the flavors to meld beautifully and ensures a firm, sliceable dessert.
What kind of apples work best?
For the best flavor and texture, a combination of apples is ideal. Granny Smith apples provide a lovely tartness that cuts through the sweetness, while Honeycrisp, Fuji, or Gala apples offer a pleasant sweetness and hold their shape well when cooked. Avoid overly mushy apples like Red Delicious.
Can I freeze leftover no bake apple pie cheesecake?
Yes, you can freeze individual slices or the entire cheesecake. Wrap it tightly in plastic wrap, then in aluminum foil. It should keep well in the freezer for up to 1-2 months. Thaw overnight in the refrigerator before serving.
No-Bake Apple Pie Cheesecake
A delicious no-bake cheesecake layered with spiced apple filling, reminiscent of apple pie, all atop a buttery graham cracker crust.
Ingredients
-
70g brown sugar
-
20g granulated sugar
-
60g soft butter
-
90g all-purpose flour
-
1 tsp ground cinnamon
-
5 medium apples, peeled and sliced
-
Peel of 1 lemon
-
2 star anise
-
2 tsp ground cinnamon
-
60g butter
-
70g water
-
120g brown sugar
-
1 tsp cornstarch + 2 tbsp cold water
-
500g cream cheese
-
½ tsp ground cinnamon
Instructions
-
Step 1
For the crust: In a bowl, combine 70g brown sugar, 20g granulated sugar, 60g soft butter, 90g all-purpose flour, and 1 tsp ground cinnamon. Mix until well combined and it resembles coarse crumbs. -
Step 2
Press the crust mixture firmly into the bottom of a 9-inch springform pan. Bake at 180°C (350°F) for 10-12 minutes until lightly golden. Let cool completely. -
Step 3
For the apple filling: In a saucepan, combine sliced apples, lemon peel, 2 star anise, 2 tsp ground cinnamon, 60g butter, 70g water, and 120g brown sugar. Simmer over medium heat for about 15-20 minutes, or until apples are tender. Stir in the cornstarch slurry (1 tsp cornstarch mixed with 2 tbsp cold water) and cook for another minute until thickened. Remove star anise and let cool. -
Step 4
For the cheesecake filling: In a large bowl, beat 500g cream cheese until smooth. Add ½ tsp ground cinnamon and mix well. -
Step 5
Spread the cooled apple filling evenly over the prepared crust. Dollop spoonfuls of the cream cheese mixture over the apples and gently spread to cover, creating a swirled effect. -
Step 6
Chill the cheesecake in the refrigerator for at least 4 hours, or until firm.
Important Information
Nutrition Facts (Per Serving)
It is important to consider this information as approximate and not to use it as definitive health advice.
Allergy Information
Please check ingredients for potential allergens and consult a health professional if in doubt.