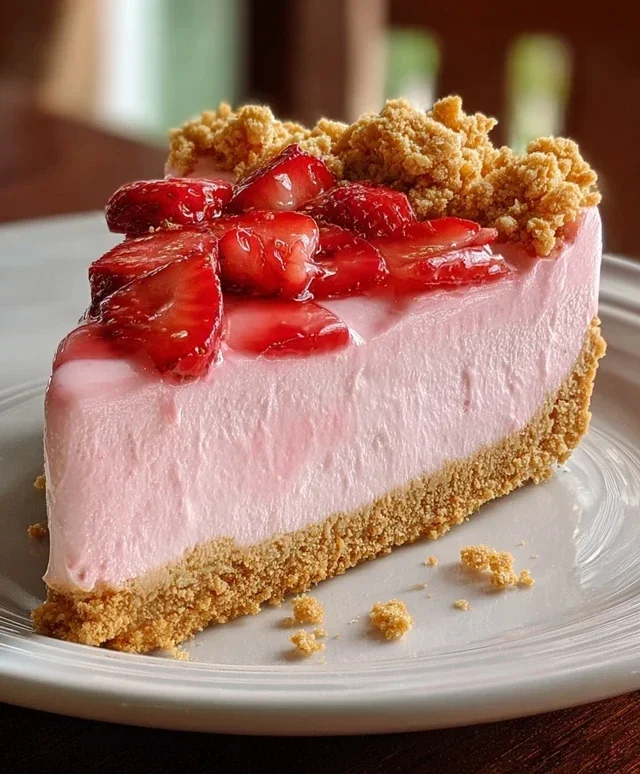
No-Bake Banoffee Cheesecake Bliss-Easy Dessert
No-Bake Banoffee Cheesecake is a dessert that truly needs no introduction, yet here we are, about to dive headfirst into its creamy, dreamy goodness. If you’ve ever experienced the sublime combination of sweet banana, rich toffee, and decadent chocolate nestled atop a buttery biscuit base, you already understand the magic. It’s the ultimate crowd-pleaser, a dessert that garners gasps of delight and requests for seconds before the first slice is even finished. What makes this particular No-Bake Banoffee Cheesecake so special? Well, it skips the oven entirely, meaning less fuss and more pure, unadulterated enjoyment. It’s a testament to how simple, high-quality ingredients can come together to create something truly spectacular, requiring minimal effort for maximum flavor impact. Prepare to fall in love all over again!

No-Bake Banoffee Cheesecake
Get ready to impress yourself and anyone lucky enough to snag a slice of this decadent no-bake Banoffee Cheesecake. This recipe is a dream for those who love the classic banoffee pie flavour combination – sweet caramel, creamy banana, and a buttery biscuit base – but want a slightly more elegant cheesecake presentation. The best part? It requires absolutely no oven time, making it perfect for any occasion, especially when you want to keep your kitchen cool. This recipe is also easily adaptable for those avoiding dairy, using delicious dairy-free alternatives that don’t compromise on flavour or texture. The creamy cashew nut base adds a wonderful richness, while the dairy-free cream cheese provides that essential cheesecake tang. It’s a sophisticated yet remarkably simple dessert that is sure to become a favourite.
Ingredients:
Preparation and Assembly
Let’s get started on creating this delightful dessert. The key to a successful no-bake cheesecake is ensuring each layer is firm enough to support the next. We’ll start with the crunchy biscuit base, move on to the lusciously creamy filling, and then finish with those essential banoffee toppings.
1. Creating the Biscuit Base
First, let’s prepare our delightful biscuit base. Take your plain biscuits and place them into a food processor. Blitz them until they form fine crum extractbs. If you don’t have a food processor, you can place the biscuits in a sturdy zip-top bag and crush them with a rolling pin until you achieve a fine crum extractb consistency. This might take a little more elbow grease but is equally effective. Next, melt your dairy-free butter or margarine in a small saucepan over low heat, or in the microwave in short bursts. Once melted, add the melted butter to the biscuit crum extractbs. Stir everything together thoroughly until all the crum extractbs are evenly coated. This mixture should resemble wet sand.
Now, take a 20cm (8-inch) springform cake tin. If you’re not using a springform tin, a regular cake tin lined with cling film will also work, though removing the cheesecake might be trickier. Pour the buttered biscuit crum extractb mixture into the prepared tin. Use the back of a spoon or the base of a glass to press the crum extractbs down firmly and evenly across the base of the tin. Ensure you create a compact and solid layer, as this will be the foundation of your cheesecake. You can also bring the crum extractbs slightly up the sides of the tin to create a little rim if you wish. Place the tin in the refrigerator to chill and firm up while we prepare the filling. This chilling process is crucial to ensure the base holds its shape once the cheesecake is assembled.
2. Crafting the Creamy Cheesecake Filling
For the creamy filling, we’ll start by draining your pre-soaked cashew nuts. Rinse them thoroughly and then place them in a high-powered blender or food processor. Add the dairy-free cream cheese, coconut cream, and icing sugar to the blender. If you don’t have a high-powered blender, ensure your cashews are as finely blended as possible before adding the other ingredients. You want the smoothest possible texture. Blend everything together until the mixture is completely smooth and creamy. You might need to stop the blender a few times and scrape down the sides to ensure everything is incorporated. The goal is a silken, lump-free consistency.
Once your filling is smooth, take your chilled biscuit base out of the refrigerator. Gently pour the creamy cheesecake filling over the biscuit base, spreading it evenly with a spatula. Ensure the surface is smooth and level, ready for the next delicious layer.
3. Adding the Banana and Caramel Layers
Now for the star flavours! Peel your medium-sized banana and slice it into thin rounds. Arrange these banana slices evenly over the top of the cheesecake filling. You can create a decorative pattern or simply cover the entire surface. Next, gently drizzle a generous amount of your vegan caramel sauce over the banana slices and cheesecake filling. Don’t be shy with the caramel; this is where the banoffee magic truly happens. Aim for a beautiful, marbled effect or a complete, luscious coating. The warmth of the caramel might slightly soften the banana, which is perfectly fine and adds to the texture.
4. Chilling and Setting the Cheesecake
This is arguably the most important step for a no-bake cheesecake: patience! Carefully cover the springform tin with cling film or pop the lid on if you’re using a container with one. Place the cheesecake in the refrigerator and let it chill for at least 4 hours, or preferably overnight. This extended chilling time allows the cheesecake to set properly, ensuring it slices cleanly and holds its delicious form. The longer it chills, the firmer and more satisfying the texture will be. Don’t be tempted to rush this process!
5. The Grand Finnon-alcoholic ale: Topping and Serving
Once your banoffee cheesecake is completely set, it’s time for the final flourish. Carefully release the springform tin by unclipping it and gently lifting the sides away. If you used a regular tin lined with cling film, carefully invert it onto a serving plate and peel away the cling film. Now for the decoration! Whip your 80ml of dairy-free whipping cream until it forms soft peaks. You can whip this by hand with a whisk or use an electric mixer for speed. Dollop or pipe the whipped cream around the edge of the cheesecake or in decorative swirls on top. Finally, add a few more slices of fresh banana and drizzle with a final swirl of vegan caramel sauce. Serve chilled and enjoy every delightful bite!

Conclusion:
And there you have it – the incredibly satisfying and surprisingly simple No-Bake Banoffee Cheesecake! This recipe is a winner because it delivers all the beloved flavors of classic banoffee pie – that luscious toffee, sweet bananas, and creamy cheesecake – without any of the oven fuss. It’s the perfect dessert for when you want something decadent and impressive with minimal effort, making it ideal for impromptu gatherings or a special treat just for yourself. I truly encourage you to give this No-Bake Banoffee Cheesecake a try; you won’t be disappointed!
For serving, I love to go all out with a generous drizzle of extra caramel sauce and a sprinkle of chocolate shavings. A dollop of whipped cream is, of course, non-negotiable! If you’re feeling adventurous, consider adding a layer of crushed digestive biscuits mixed with a little melted butter to the banana layer for an extra textural element, or even folding some finely chopped dark chocolate into the cream cheese mixture for a chocolatey twist. The possibilities are truly delicious!
Frequently Asked Questions:
Can I make this No-Bake Banoffee Cheesecake ahead of time?
Absolutely! This cheesecake is actually best made at least 4-6 hours in advance, or even the day before. This allows the flavors to meld beautifully and the cheesecake to set up properly in the refrigerator. Just cover it tightly with plastic wrap once it’s chilled and ready to go.
What kind of bananas are best to use?
For this recipe, slightly ripe but not overly mushy bananas work best. They should be sweet and easy to mash or slice, but still hold their shape somewhat. Avoid bananas that are too green, as they won’t be sweet enough, and those that are excessively brown and soft, as they can make the cheesecake too wet.
How long does the cheesecake last in the refrigerator?
Stored properly in an airtight container, your No-Bake Banoffee Cheesecake should stay delicious in the refrigerator for up to 3-4 days. The texture might change slightly over time as the bananas release more moisture, but it will still be incredibly tasty!
No-Bake Banoffee Cheesecake
A delicious and easy no-bake banoffee cheesecake with a biscuit base, creamy cashew filling, and topped with banana and caramel.
Ingredients
-
200g plain biscuits (use gluten-free biscuits if required)
-
100g dairy-free butter or margarine
-
140g cashew nuts (pre-soaked in warm water overnight)
-
340g dairy-free cream cheese
-
50g coconut cream
-
80g icing sugar
-
1 medium-sized banana
-
Vegan caramel sauce (store-bought or homemade)
-
Fresh banana slices
-
80ml dairy-free whipping cream
Instructions
-
Step 1
Crush the plain biscuits (or gluten-free biscuits) into fine crumbs. Mix with melted dairy-free butter or margarine until well combined. Press this mixture firmly into the base of a 20cm (8-inch) springform tin. -
Step 2
Drain the pre-soaked cashew nuts. Place them in a high-speed blender along with the dairy-free cream cheese, coconut cream, and icing sugar. Blend until completely smooth and creamy, scraping down the sides as needed. -
Step 3
Peel and slice the medium-sized banana. Arrange the banana slices evenly over the biscuit base in the springform tin. -
Step 4
Pour the cashew cream mixture over the banana slices and smooth the top with a spatula. -
Step 5
Drizzle a generous amount of vegan caramel sauce over the cheesecake filling. -
Step 6
Whip the dairy-free whipping cream until it forms soft peaks. Dollop or pipe the whipped cream around the edge of the cheesecake for decoration. -
Step 7
Decorate the top of the cheesecake with fresh banana slices and an additional drizzle of vegan caramel sauce. -
Step 8
Chill the cheesecake in the refrigerator for at least 4 hours, or preferably overnight, to set firmly before serving.
Important Information
Nutrition Facts (Per Serving)
It is important to consider this information as approximate and not to use it as definitive health advice.
Allergy Information
Please check ingredients for potential allergens and consult a health professional if in doubt.