Easy Mini Chicken Pot Pies – Delicious & Quick
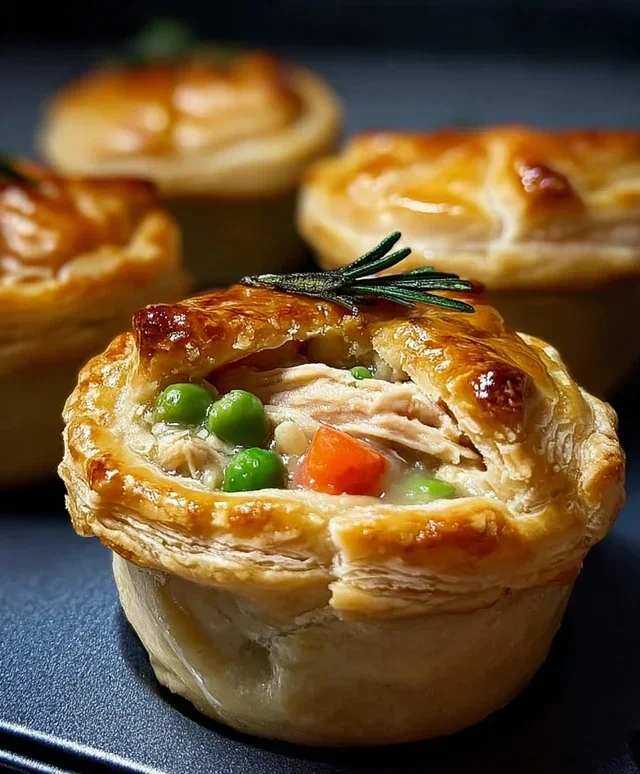
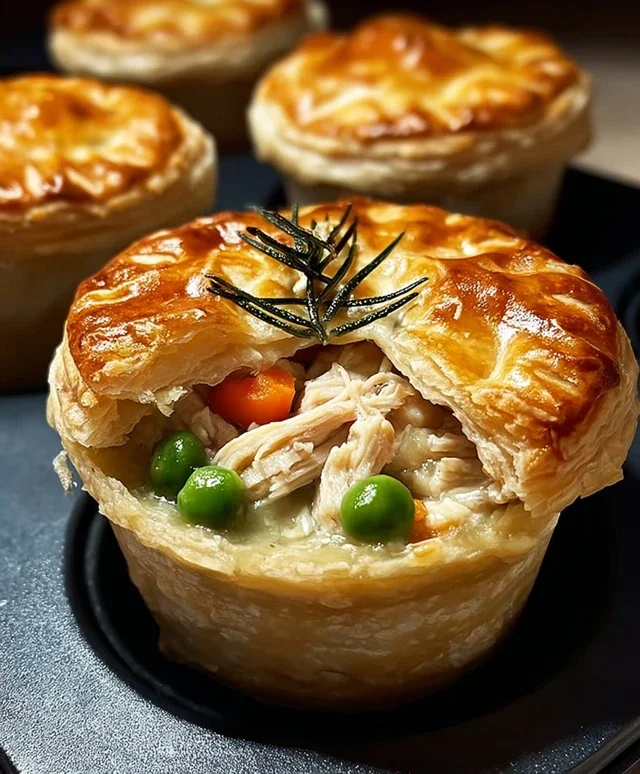
Mini chicken pot pies are the ultimate comfort food, miniaturized for your pure enjoyment. Imagin extracte this: flaky, golden pastry cradling a rich, creamy filling bursting with tender chicken, sweet peas, carrots, and savory potatoes. It’s a classic for a reason, evoking nostalgic feelings of cozy evenings and happy family dinners. But what makes these mini chicken pot pies so utterly irresistible? It’s the perfect balance of textures and flavors, the satisfying crunch of the crust giving way to that heartwarming, velvety stew. They’re individual portions of pure bliss, making them ideal for entertaining, a special weeknight treat, or even a fun lunch. Forget the fuss of a large pie; these little parcels of deliciousness deliver all the comforting goodness in a delightful, bite-sized package. Get ready to fall in love with these charming mini chicken pot pies all over again!”
Mini Chicken Pot Pies
There’s something incredibly comforting about a classic chicken pot pie. The creamy filling, tender chicken, and savory vegetables all nestled under a flaky crust evoke feelings of warmth and home. But sometimes, the thought of making a full-sized pie can feel a little daunting, especially on a weeknight. That’s where these adorable mini chicken pot pies come in! They deliver all the deliciousness of their larger counterparts in perfectly portioned, easy-to-make packages. Using refrigerated biscuits as the crust makes this recipe incredibly accessible, perfect for a quick family dinner or even a fun appetizer. Let’s get started and whip up some miniature comfort food!
Ingredients:
Preparing Your Pot Pie Components
Before we dive into assembling these little gems, it’s important to get all your ingredients ready. This ensures a smooth and efficient cooking process. First, let’s tackle the chicken. You’ll want to dice your boneless chicken breast into small, bite-sized pieces. This ensures that the chicken cooks through evenly and is easy to eat in each mini pot pie. I like to do this ahead of time and keep it in a small bowl. Next, there’s no need to thaw the frozen peas and carrots; they’ll cook perfectly within the filling.
Cooking the Chicken
While you can technically add the raw chicken directly into the filling and let it cook there, I find that a quick sauté makes a world of difference in both flavor and texture. To do this, I’ll take a non-stick skillet, add a tiny bit of cooking spray or oil, and heat it over medium-high heat. Once the pan is hot, I add the diced chicken. We’re not looking to cook it all the way through at this stage, just to get a nice sear on the outside and start the cooking process. This usually takes about 3-5 minutes, stirring occasionally, until the chicken is no longer pink on the outside. This step also helps to render out any excess fat and adds a lovely depth of flavor. Once seared, I remove the chicken from the skillet and set it aside in a bowl.
Creating the Creamy Filling
Now for the heart of our mini pot pies: the creamy filling. In a medium-sized mixing bowl, combine the can of cream of chicken soup. This is the base for our delicious filling and provides that classic, velvety texture. To this, we’ll add our seasonings. Sprinkle in the ½ teaspoon of garlic powder, which adds a wonderful aromatic element without being overpowering. Then, add the ½ teaspoon of onion powder for a subtle savory depth. Finally, season with ¼ teaspoon of salt. I always recommend starting with this amount and tasting the filling later, as you can always add a pinch more if needed.
Next, add the frozen peas and carrots directly into the bowl with the soup and seasonings. Don’t worry about thawing them; they will cook beautifully when baked. Now, add your seared diced chicken to the bowl. Gently stir everything together until all the ingredients are well combined and coated in the creamy soup mixture. Make sure to get everything mixed evenly so you have a consistent distribution of chicken and vegetables in every bite.
Assembling the Mini Pot Pies
This is where the magic really happens and we turn simple ingredients into something special. You’ll need a muffin tin for this. Generously coat the muffin tin cups with cooking spray. This is crucial to prevent your pot pies from sticking and to ensure they pop out cleanly once baked.
Now, take one can of the refrigerated biscuits. You’ll want to unroll the dough and separate the biscuits. For each muffin tin cup, you’ll need to press one biscuit to flatten it slightly. I usually do this by hand, just pressing it out to make it a bit larger and thinner than its origin extractal shape. Then, carefully press one of these flattened biscuits into the bottom and up the sides of each muffin cup, creating a little bowl. You want to make sure the dough goes up the sides sufficiently to hold the filling. If the dough tears a little, don’t worry; you can just pinch it together to seal it. Repeat this for all 12 muffin cups.
Once your biscuit “crusts” are in place, spoon the chicken and vegetable filling evenly into each biscuit-lined cup. Fill them up, but try not to overfill, as you want to leave a little room for the biscuit topping.
For the tops of our mini pot pies, take the second can of refrigerated biscuits. Again, unroll and separate the biscuits. You’ll want to flatten these biscuits just like you did for the bottoms, but this time, you’ll be placing them on top of the filling. You can either press them down gently to cover the filling completely, or if you want a more rustic look, you can cut them into smaller pieces and arrange them artfully on top. I often find just pressing a flattened biscuit on top works perfectly and creates a lovely little lid. Gently press the edges of the top biscuit down to seal it to the bottom biscuit, creating a complete little pie.
Baking Your Mini Pot Pies
Now that our mini pot pies are assembled and ready for their close-up, it’s time to bake them to golden perfection. Preheat your oven to 375 degrees Fahrenheit (190 degrees Celsius). Place the prepared muffin tin onto a baking sheet. This is a good practice to catch any potential drips and makes it easier to transfer the hot tin in and out of the oven.
Bake for approximately 20 to 25 minutes, or until the biscuit crusts are golden brown and puffed up, and the filling is hot and bubbly. The exact baking time can vary depending on your oven, so keep an eye on them. You want that beautiful golden hue on the biscuit tops.
Once baked, carefully remove the muffin tin from the oven. Let the mini pot pies cool in the muffin tin for about 5-10 minutes. This allows them to set slightly and makes them easier to remove. After they’ve cooled a bit, you can gently run a knife or spatula around the edges of each cup to loosen them, and then carefully lift them out. Serve these warm and enjoy the delightful taste of homemade comfort in every bite!
Conclusion:
These mini chicken pot pies are truly a delightful and satisfying meal, perfect for any occasion. Their individual portions make them ideal for weeknight dinners, charming appetizers for gatherings, or even a comforting solo treat. The flaky pastry crust combined with the creamy, savory chicken and vegetable filling is a classic combination that never disappoints. They’re incredibly versatile, allowing you to tailor the ingredients to your preferences, and surprisingly easy to assemble, even for begin extractner cooks. I really encourage you to give this recipe a try; I’m confident you’ll fall in love with these adorable and delicious mini chicken pot pies!
For serving, these are wonderful on their own, but I also love to pair them with a light side salad dressed with a vinaigrette or some steamed green beans. They reheat beautifully, making them a fantastic option for meal prep.
Looking for some variations? Feel free to swap out the chicken for diced turkey or even firm tofu. You can also experiment with different vegetables like peas, corn, mushrooms, or even leeks. A pinch of nutmeg in the filling adds a lovely warmth!
Frequently Asked Questions:
Can I make these ahead of time?
Absolutely! You can assemble the mini chicken pot pies completely and refrigerate them for up to 24 hours before baking. You might need to add a few extra minutes to the baking time if they’re going in from the fridge.
What kind of crust should I use?
The recipe calls for a standard pie crust, but feel free to use puff pastry for an extra flaky and decadent experience. Both work wonderfully!
How do I store leftovers?
Leftover mini chicken pot pies can be stored in an airtight container in the refrigerator for up to 3-4 days. Reheat them in a 350°F (175°C) oven until warmed through.
Mini Chicken Pot Pies
Quick and easy individual chicken pot pies made with refrigerated biscuits.
Ingredients
-
2 cans refrigerated biscuits (8-count each)
-
½ lb boneless chicken breast, diced
-
1 cup frozen peas & carrots
-
1 can (10.5 oz) cream of chicken soup
-
½ tsp garlic powder
-
½ tsp onion powder
-
¼ tsp salt
-
Cooking spray
Instructions
-
Step 1
Preheat oven to 375°F (190°C). Lightly grease an 8-cup muffin tin with cooking spray. -
Step 2
In a bowl, combine the diced chicken breast, frozen peas & carrots, cream of chicken soup, garlic powder, onion powder, and salt. Mix well. -
Step 3
Unroll the refrigerated biscuits. Press each biscuit into the bottom and up the sides of the muffin cups, creating a crust. -
Step 4
Spoon the chicken mixture evenly into the biscuit-lined muffin cups. -
Step 5
Bake for 18-20 minutes, or until the biscuits are golden brown and the filling is bubbly. -
Step 6
Let cool for a few minutes before carefully removing from the muffin tin.
Important Information
Nutrition Facts (Per Serving)
It is important to consider this information as approximate and not to use it as definitive health advice.
Allergy Information
Please check ingredients for potential allergens and consult a health professional if in doubt.