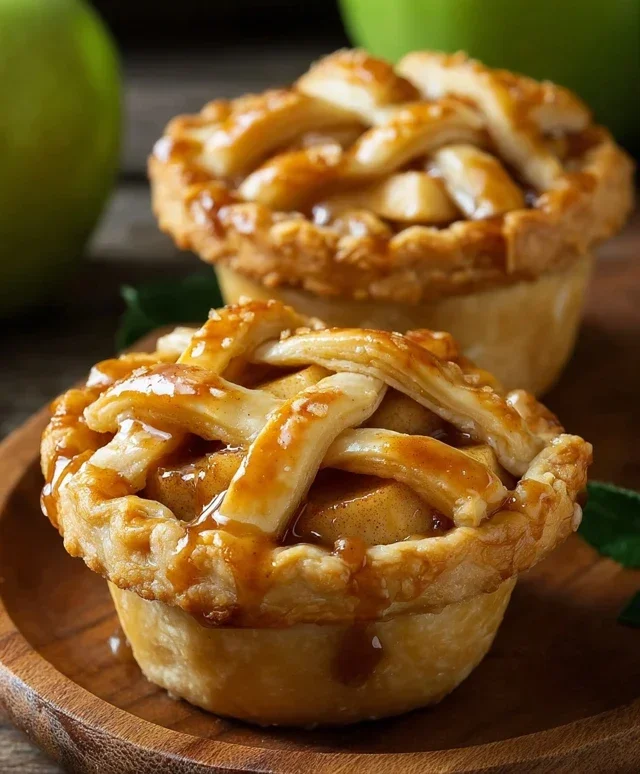
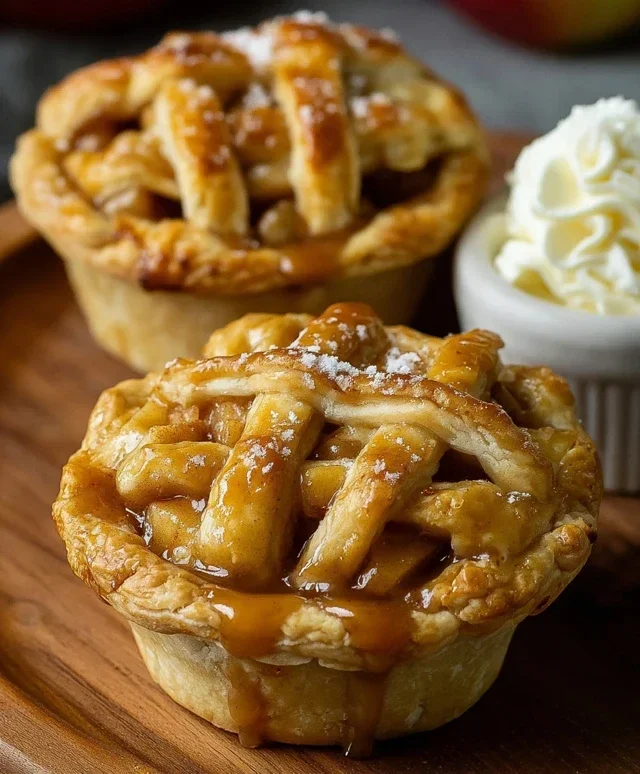
Delicious Mini Apple Pies Easy Recipe
Mini Apple Pies are the ultimate handheld delight, perfect for any occasion. There’s something undeniably magical about biting into a warm, perfectly spiced apple filling encased in a flaky, golden crust, all in a delightful single serving. We all love apple pie, right? It’s a classic for a reason – that comforting blend of sweet and tart apples, cinnamon, and nutmeg just evokes feelings of home and cozy gatherings. But these mini apple pies take that beloved dessert to a whole new level of charm and convenience. Imagin extracte serving a whole parade of these little wonders at your next party, or simply enjoying one as a personal treat after a long day. What truly makes these mini apple pies special is their adorable presentation and the fact that everyone gets their own perfect portion of pure apple pie bliss. Let’s dive in and create some sweet magic!
Mini Apple Pies
There’s something undeniably charming and utterly delicious about mini apple pies. They’re the perfect portion-sized indulgence, ideal for potlucks, parties, or simply when you crave that warm, comforting taste of apple pie without the commitment of a full-sized dessert. These little hand pies are surprisingly easy to make, especially with the convenience of refrigerated pie crusts. They bake up beautifully golden brown, with a gooey, spiced apple filling that will have everyone reaching for seconds. Forget complicated pastry-making; we’re going for simple, satisfying, and seriously scrum extractptious. Let’s dive into creating these delightful mini masterpieces!
Ingredients:
Getting Started: Preparing the Apples and Crust
The foundation of any great apple pie is, of course, the apples. For these mini pies, I prefer Granny Smith apples. Their tartness provides a wonderful balance to the sweetness of the sugars, and they hold their shape well during baking, preventing a mushy filling. Before you begin extract, preheat your oven to 400°F (200°C). This high heat helps the crust become wonderfully flaky and golden quickly.
Next, let’s get our apples ready. Peel, core, and then chop your Granny Smith apples into small, bite-sized pieces. Aim for pieces that are roughly 1/4 to 1/2 inch in size. This ensures that they cook through evenly within the small pie crusts. You’ll need about 3 cups of chopped apples. In a large bowl, combine your chopped apples with the granulated sugar and light brown sugar. The brown sugar adds a lovely caramel-like depth to the flavor. Now, sprinkle in the ground cinnamon and ground nutmeg. These warm spices are classic pairings with apple and will fill your kitchen with an incredible aroma as the pies bake. Finally, add the all-purpose flour. The flour acts as a thickener, ensuring that your filling isn’t too runny once it’s baked. Give everything a good stir until the apples are evenly coated with the sugar, spice, and flour mixture. Stir in the vanilla extract for an extra layer of flavor.
Now, let’s tackle the crust. Gently unroll your two refrigerated pie crusts onto a lightly floured surface. You want to work with them fairly quickly so they don’t become too warm and sticky. Using a round cookie cutter or a biscuit cutter that is about 4-5 inches in diameter, cut out as many circles as you can from each crust. You should aim for at least 8 circles, and possibly up to 10 depending on the size of your cutter and how efficiently you place them. You can gently gather and re-roll the scraps once, but be careful not to overwork the dough, as this can make the crust tough.
Assembling Your Mini Pies
With your apple filling prepared and your crust circles cut, it’s time to assemble these adorable pies. Take half of your crust circles and place them onto a baking sheet lined with parchment paper. This makes for easy cleanup! Now, spoon a generous amount of the apple filling onto the center of each of these bottom crust circles. Be careful not to overfill them, as this can cause the filling to leak out during baking. Leave about a 1/2 inch border around the edge of each circle.
To create the tops of your mini pies, you have a couple of options. You can simply place another crust circle directly on top of the filling and crimp the edges to seal. Alternatively, for a more decorative look, you can use your cookie cutter to cut out smaller shapes from the remaining crust circles (like little leaves or stars) and arrange them on top of the filling before placing a full crust circle over them, or even create a lattice top by cutting strips of dough. Once you have your filling in place on all the bottom crusts, it’s time to seal them. Place the remaining crust circles (or your decorative tops) over the filling. Then, using your fingers or a fork, press the edges of the top and bottom crusts together firmly to create a good seal. This is crucial to prevent the filling from escaping during baking. If you are using full top crusts, you might want to cut a small slit or two in the top to allow steam to escape.
The Finishing Touch and Baking
For that beautiful, golden-brown sheen and a little extra sparkle, we’ll make an egg wash. In a small bowl, whisk together the egg and the tablespoon of water until well combined. This mixture will be brushed over the tops of your mini pies. This not only adds color but also helps any optional sanding sugar stick to the crust. Using a pastry brush, gently brush the egg wash over the entire surface of each mini pie. If you’re using sanding sugar, now is the time to sprinkle it generously over the egg-washed tops. The sanding sugar will catch the light and give your pies a delightful, almost crystalline finish.
Now, it’s time for the magic to happen in the oven! Carefully place your baking sheet into the preheated oven. Bake for approximately 20-25 minutes, or until the crusts are a deep golden brown and you can see the apple filling bubbling slightly through any vents you’ve made. Keep an eye on them, as oven temperatures can vary. If the crust starts to brown too quickly, you can loosely tent the baking sheet with aluminum foil for the remaining baking time.
Cooling and Serving
Once your mini apple pies are beautifully baked and fragrant, remove them from the oven. Let them cool on the baking sheet for about 10-15 minutes. This allows the filling to set up properly. Trying to move them too soon can result in a broken pie or a runny filling. After they’ve cooled slightly, you can carefully transfer them to a wire rack to cool completely, or serve them warm. These mini apple pies are wonderful on their own, but they are absolutely divine served with a scoop of vanilla ice cream or a dollop of whipped cream. Enjoy the delightful taste of homemade apple pie, in a perfectly portioned package!
Conclusion:
And there you have it – a delightful guide to creating these irresistible mini apple pies! I hope you’ve enjoyed learning how simple and rewarding it is to whip up these individual sweet treats. The beauty of this recipe lies in its perfect balance of flaky crust and warmly spiced, tender apple filling. They’re incredibly charming, making them ideal for any occasion, from a casual weeknight dessert to a show-stopping addition to a holiday spread. Don’t hesitate to experiment with different spices like nutmeg or allspice, or even add a handful of dried cranberries for a festive twist. I truly encourage you to give these mini apple pies a try; I’m confident you’ll fall in love with their miniature charm and magnificent flavor.
Frequently Asked Questions:
Can I make these mini apple pies ahead of time?
Absolutely! You can prepare the pie shells and filling separately a day in advance and store them in the refrigerator. Assemble and bake them just before serving for the freshest taste and texture. You can also bake them completely and reheat them gently in a low oven for about 10-15 minutes.
What if I don’t have mini pie pans?
No problem! You can adapt this recipe for a larger pie by using a standard 9-inch pie plate. You can also use muffin tins; simply press the dough into the cups and fill with the apple mixture. The baking time might need slight adjustment, so keep an eye on them.
Mini Apple Pies
Delightful individual apple pies perfect for any occasion.
Ingredients
-
2 refrigerated pie crusts
-
3 cups chopped Granny Smith apples
-
1/4 cup granulated sugar
-
1/4 cup light brown sugar
-
1 teaspoon ground cinnamon
-
1/4 teaspoon ground nutmeg
-
2 tablespoons all-purpose flour
-
1 teaspoon vanilla extract
-
1 egg
-
1 tablespoon water
-
Sanding sugar (optional)
Instructions
-
Step 1
Preheat oven to 375°F (190°C). Lightly grease a 12-cup muffin tin. -
Step 2
In a large bowl, combine chopped apples, granulated sugar, brown sugar, cinnamon, nutmeg, and flour. Toss to coat evenly. -
Step 3
Unroll pie crusts and cut out 12 circles, approximately 4 inches in diameter, using a round cookie cutter or the rim of a glass. Press the circles into the muffin tin cups, forming the bottom crusts. -
Step 4
Divide the apple mixture evenly among the pie crusts in the muffin tin. Stir in vanilla extract. -
Step 5
In a small bowl, whisk together the egg and water to create an egg wash. Brush the edges of the pie crusts with the egg wash. -
Step 6
If desired, cut small decorative shapes from any leftover pie crust for the tops of the mini pies. Place them on top of the apple filling. Brush the tops with egg wash and sprinkle with sanding sugar. -
Step 7
Bake for 20-25 minutes, or until the crust is golden brown and the filling is bubbly. Let cool in the muffin tin for 10 minutes before carefully removing to a wire rack to cool completely.
Important Information
Nutrition Facts (Per Serving)
It is important to consider this information as approximate and not to use it as definitive health advice.
Allergy Information
Please check ingredients for potential allergens and consult a health professional if in doubt.